Amazon S3
This page shows how to connect to Amazon S3 and write SAP data to an Amazon S3 bucket. The setup in Xtract Universal.iQ consists of 3 main steps:
For more information on Amazon S3, see AWS Documentation: Getting Started with Amazon S3.
Requirements
- Access to an Amazon Web Services (AWS) Account.
- Access to an S3 bucket to upload data to.
- Permissions for list, read and write activities on S3. Grant these rights in the user policy. You can limit the permissions to certain buckets. Required permissions:
ListAllMyBucketsListBucketGetObjectListMultipartUploadPartsAbortMultipartUploadPutObject
- Access Keys that consist of the "access key ID" and the "secret access key" of your AWS user or an IAM role. For more information, see AWS Documentation: Access Keys and AWS Documentation: Security best practices in IAM.
Recommendation
It is recommended to enable S3 versioning or perform data backups regularly, see Amazon AWS: Getting Started - Backup & Restore with AWS.
Connect to Amazon S3
To create a connection to an Amazon AWS S3 bucket:
- Open the Connections menu.
- Click [Add Connection].
- Enter a name in the Connection Name field.
- Select Amazon S3 from the Connection Type dropdown. The corresponding settings open.
- Fill out the connection settings.
- Click [Test Connection] to validate the connection parameters. A status message opens in the bottom right corner of the window.
- If the connection is successful, click [Save].
The connection is now listed in the Connections menu and can be assigned to services.
Next, assign the destination to a service.
Assign Amazon S3 to a Service
To assign the Amazon S3 destination to a service:
- Open the Services menu.
- Select one or more services.
- Click [ Edit].
- Select an existing Amazon S3 connection from the Destination dropdown.
- Click [Save].
When running the service, the results are written to Amazon S3 bucket.
Next, check if the service-specific destination settings match your needs.
About Data Uploads
Xtract Universal.iQ uses multipart upload to load data to Amazon S3. This means, extracted SAP data is uploaded to S3 not as one big chunk, but in smaller parts. These parts are buffered on the S3 side. If the upload is successful, the parts are assembled by Amazon S3 into a single file. The file is not visible until the upload is complete.
For more information about multipart uploads, see AWS Documentation: Uploading and copying objects using multipart upload in Amazon S3.
Error Handling for Multipart Uploads
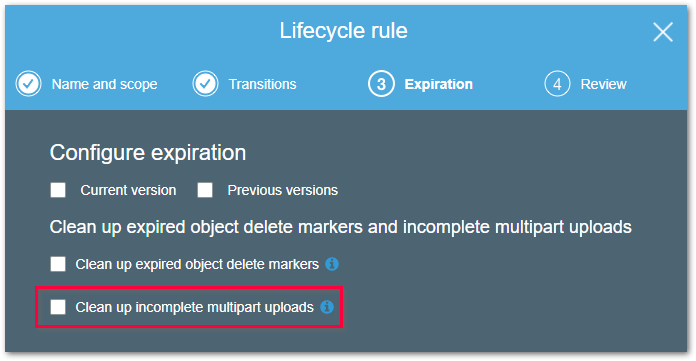
In case the service run aborts or fails, the already uploaded parts are deleted from Amazon S3. In case of an "uncontrolled" service failure, for example due to network issues, Xtract Universal.iQ cannot delete the uploaded parts from Amazon S3.
Therefore it is recommended to delete unused multiparts automatically in regular intervals, e.g., after a day. To create a rule for deleting unused multiparts in Amazon S3, navigate to the Management tab of your bucket settings and select Lifecycle > Add lifecycle rule.
Connection Settings
Connection settings define how Xtract Universal.iQ connects to Amazon S3. To open the connection settings:
- Open the Connections menu.
- Select a connection of type Amazon S3.
- Click [ Edit].
The connection settings of the Amazon S3 connection open and can be modified.
System
The System section contains settings that define the Amazon S3 object storage to connect to.
Use AWS S3 Endpoint
When active, Xtract Universal.iQ connects to Amazon S3 using a URL that consists of the bucket name and the Amazon S3 default URL: https://[BucketName].s3.amazonaws.com/
Use VPC Endpoint
When active, Xtract Universal.iQ connects to Amazon S3 using a Virtual Private Cloud (VPC) endpoint. This option requires Xtract Universal.iQ to run on an AWS VPC instance.
VPC Endpoint
Enter the VPC endpoint in the format http://bucket.[endpoint] in the field VPC endpoint. Example:
http://bucket.vpce-0123456789abcdefg-hijklmno.s3.us-east-1.vpce.amazonaws.com.
Authentication
The Authentication section contains settings that define how to connect to Amazon S3. Xtract Universal.iQ supports two authentication methods for connecting to Amazon S3:
- IAM role
- User credentials
Use IAM role
When active, the credentials and permissions of the IAM role assigned to the EC2 instance, on which Xtract Universal.iQ is running are used for authentication. For more information on the IAM role, see AWS Documentation: Security best practices in IAM.
Use user credentials
When active, Xtract Universal.iQ uses AWS Access Keys (an access key ID and secret access key) to authenticate with AWS services. These credentials are managed by AWS Identity and Access Management (IAM).
Access Key
The access key ID is a 20-character, alphanumeric string, e.g., AKIAIOSFODNN7EXAMPLE. You can find or generate access keys in the AWS Management Console by navigating to:
IAM > Users > [Your User] > Security credentials.
Secret Key
The secret access key is a 40-character string, e.g., wJalrXUtnFEMI/K7MDENG/bPxRfiCYEXAMPLEKEY. Note that secret keys are shown only once at creation time. Make sure to copy them and store them in a safe location.
Connect
Click [Connect] to validate your connection settings. A status message is displayed at the bottom right corner of the screen.
Bucket
The Bucket section contains settings that define which bucket to connect to.
Region
Select the region of your Amazon S3 bucket.
Bucket
The Bucket dropdown becomes available once a bucket region is selected. Click to load or refresh the list of available buckets in Amazon S3. Select a bucket from the drop-down list. The SAP data is written into the selected bucket.
Test Connection
Click [Text Connection] to validate the connection to your bucket. A status message is displayed at the bottom right corner of the screen.
Server Side Encryption
The Server Side Encryption section contains settings for encrypting data after uploading them to S3.
Note
The setting "Server-side encryption" does not relate to transport encryption between Xtract Universal.iQ and S3. By default, the channel for sending data to S3 is always encrypted.
Encryption Type
Select one of the following encryption types for the data connection:
- SSE-S3 encrypts data using the by default available S3 user account encryption key, see S3 Managed Encryption Keys.
- SSE-KMS uses a custom encryption key created on AWS, see AWS Key Management Services for encryption.
Key ID
Enter the key for the SSE-KMS encryption. The key can be created on the AWS website - Encryption Keys. SSE-S3 encryption does not require a Key ID.
File Format
The File Format section defines the format of the output file written to the Amazon S3 bucket.
File Type
Select one of the following file formats used for the service output:
- JSON
- Parquet
Compatibility mode
For Parquet files, a compatibility mode can be selected to ensure compatibility with different processing engines, such as Spark or Hadoop. The following compatibility modes are available:
- Pure: standard parquet format
-
Spark: ensures compatibility with Apache Spark by using different data types than the standard parquet format:
SAP Pure / BigQuery Spark INT1 UINT_8 INT16 TIMS TIME_MILLIS UTF8 -
BigQuery: ensures compatibility with with Google BigQuery by formatting the columns names, see BigQuery Documentation: Column Names.
Note
If an SAP Table contains a 6-character time field of type TIMS (format HHMMSS for hours, minutes and seconds), make sure to use the compatibility mode Spark to ensure compatibility with Microsoft.
Misc
Additional connection settings for Amazon S3. All settings in Misc are optional.
Folder Path
Creates a folder structure within the bucket.
- Create a single folder by entering a folder name without slashes:
[folder] - Create subfolders using the following syntax:
[folder]/[subfolder_1]/[subfolder_2]/[..]
Note
The specified folder path applies to all extractions. To define a folder path for single services, use the Folder option in the Destination Settings.
File Owner
If you upload files as an AWS user of an Account A to an Account B, you can select the option "BucketOwnerFull". Without a declared owner, uploaded files cannot be opened directly.
Destination Settings
Destination settings define how and where a service saves its output data, such as the target folder and filename.
To open the destination settings:
- Open the Services menu.
- Select a service that uses the Amazon S3 connection.
- Click [ Edit]. The service settings open.
- Open the tab Destination Settings.
The destination settings for Amazon S3 are open and can be modified.
File Name
Determines the name of the target table. The following options are available:
| Option | Description |
|---|---|
| Same as service name | Adopt the name of the service. |
| Custom | Define a name of your choice in the Custom File Name input field. |
Append timestamp
Adds a timestamp in the format _YYYY_MM_DD to the filename of the service.
Note
If the name of the object does not begin with a letter, it will be prefixed with an ‘x’, e.g. an object by the name _namespace_tabname.csv will be renamed x_namespace_tabname.csv when uploaded to the destination. This is to ensure that all uploaded objects are compatible with Azure Data Factory, Hadoop and Spark, which require object names to begin with a letter or give special meaning to objects whose names start with certain non-alphabetic characters.
Column Name Format
Defines the format of the column name. The following options are available:
| Option | Description |
|---|---|
| Code | The SAP technical column name is used as column name in the destination e.g., MAKTX. |
| PrefixedCode | The SAP technical column name is prefixed by SAP object name and the tilde character e.g., MAKT~MAKTX |
| CodeAndText | The SAP technical column name and the SAP description separated by an underscore are used as column name in the destination e.g., MAKTX_Material Description (Short Text). |
| TextAndCode | The SAP description and the SAP technical column name description separated by an underscore are used as column name in the destination e.g., Material Description (Short Text)_MAKTX. |
| Text | The SAP description is used as column name in the destination e.g., Material Description (Short Text). |
File Settings
File Splitting
Writes extraction data of a single extraction to multiple files. Each filename is appended by _part[nnn].
Max. File Size (in MB)
Defines the maximum size of each splitted file.
Note
The option Max. File Size does not apply to gzip files. The size of a gzipped file cannot be determined in advance.
GZip Compression
When enabled, the data is transferred compressed and stored as a gz file.
Custom Directory
Writes the extracted data to a specific folder structure within the bucket. If the specified folder does not exist, it is created.
- Create a single folder by entering a folder name without slashes:
folder - Create subfolders using the following syntax:
folder/subfolder_1/subfolder_2/...
Note
The specified folder path only applies to the selected service. To define a folder path for all extractions, use the Folder path option in the Connection Settings.
Script Expressions for Dynamic Folder Paths
Script expressions can be used to generate a dynamic folder path. This allows generating folder paths that are composed of service properties, e.g., service name, SAP source object. The described scenario supports script expressions based on .NET and the following custom script expressions:
| Input | Description |
|---|---|
#{Source.Name}# | Name of the SAP source. |
#{Extraction.ExtractionName}# | Name of the service. |
#{Extraction.Type}# | Service type (Table, Report, BAPI, etc.). |
#{Extraction.SapObjectName}# | Name of the SAP object that the service is extracting data from. |
#{Extraction.Timestamp}# | Timestamp of the service. |
#{Extraction.SapObjectName.TrimStart("/".ToCharArray())}# | Removes the first slash '/' of an SAP object. Example: /BIO/TMATERIAL to BIO/TMATERIAL - prevents creating an empty folder in a file path. |
#{Extraction.SapObjectName.Replace('/', '_')}# | Replaces all slashes '/' of an SAP object. Example: /BIO/TMATERIAL to _BIO_TMATERIAL - prevents splitting the SAP object name by folders in a file path. |
#{TableExtraction.WhereClause}# | Only for Table services: returns the WHERE clause of the service. |
Create files for empty data sets
When active, empty result sets create an empty file in the target environment. Deactivate this option to not create empty files.
Date Conversion
Convert SAP Dates
Converts the SAP date format (YYYYMMDD) to a regular date format (YYYY-MM-DD), e.g., 19900101 becomes 1990-01-01. Target data uses a real date data-type and not the string data-type to store dates.
Replace SAP Dates 0000XXXX with
Converts the SAP date 00000000 to the entered value.
Replace SAP Dates 9999XXXX with
Converts the SAP date 9999XXXX to the entered value.
Replace Invalid SAP Dates with
If an SAP date cannot be converted to a valid date format, the invalid date is converted to the entered value. NULL is supported as a value. When converting the SAP date the two special cases 00000000 and 9999XXXX are checked first.