Microsoft Fabric Mirroring
This page shows how to set up and use the Microsoft Fabric Mirroring destination. This destination enables users to continuously map SAP data to a datalake using Microsoft Fabric's open mirroring feature. To set up Open Mirroring with Xtract Universal.iQ:
- Create a mirrored database in Microsoft Fabric.
- Connect Xtract Universal.iQ to the Microsoft Fabric Mirroring landing zone.
- Create a TableCDC service that extracts data from SAP tables.
- Assign the Microsoft Fabric Mirroring destination to the Table CDC service.
- Run the service to initialize the delta mechanism and optionally load the first data to Microsoft Fabric.
- Schedule the service to run in an interval of your choice.
About Open Mirroring
Microsoft Fabric's Open Mirroring allows users to replicate existing data directly into Fabric's OneLake from a variety of external databases and other data sources. The data is written into an open mirroring landing zone, where it is processed by the mirroring replication engine of Microsoft Fabric. Mirroring delivers the data incrementally in a parquet format that is used to merge the data in OneLake.
For more information, see Microsoft Documentation: Open mirroring in Microsoft Fabric.
Requirements
- An active and running Fabric capacity is required. A paused or deleted capacity affects Mirroring so that no data is replicated.
- The Landing Zone URL of a mirrored database in Microsoft OneLake is required, see Microsoft Tutorial: Configure Microsoft Fabric open mirrored databases.
- The Microsoft Fabric Mirroring destination is currently only supported by the Table CDC and the CDSFlow service type.
Tip
You can also use the regular Table service type to extract the initial full load of the table or view.
Connect to Microsoft Fabric OneLake
To create a connection to the Microsoft Fabric Mirroring landing zone:
- Open the Connections menu.
- Click [Add Connection].
- Enter a name in the Connection Name field.
- Select Microsoft Fabric Mirroring from the Connection Type dropdown. The corresponding settings open.
- Fill out the connection settings.
- Click [Test Connection] to validate the connection parameters. A status message opens in the bottom right corner of the window.
- If the connection is successful, click [Save].
The connection is now listed in the Connections menu and can be assigned to services.
Next, assign the destination to a service.
Assign Microsoft Fabric Mirroring to a Service
To assign the Microsoft Fabric Mirroring destination to a service:
- Open the Services menu.
- Select one or more services.
- Click [ Edit].
- Select an existing Microsoft Fabric Mirroring connection from the Destination dropdown.
- Click [Save].
When running the service, the results are written to the Microsoft Fabric Mirroring landing zone.
Next, check if the service-specific destination settings match your needs.
Connection Retry and Rollback
Connection retry is a built-in function of the Microsoft Fabric Mirroring destination. The retry function is activated by default.
Connection retry is a functionality that prevents extractions from failing in case of transient connection interruptions to Microsoft Fabric Mirroring. Xtract Universal follows an exponential retry strategy. The selected exponential strategy results in seven retry attempts and an overall timespan of 140 seconds. If a connection is not established during the timespan of 140 seconds, the extraction fails.
The retry function is applied after receiving one of the following HTTP errors or exceptions:
- 503 Service Unavailable
- 504 Gateway Timeout
- WebExceptionStatus.ConnectionClosed
- WebExceptionStatus.ConnectFailure
- WebExceptionStatus.Timeout
- WebExceptionStatus.RequestCanceled
- WebExceptionStatus.SendFailure
- WebExceptionStatus.NameResolutionFailure
Connection Settings
Connection settings define how Xtract Universal.iQ connects to the Microsoft Fabric Mirroring service. To open the connection settings:
- Open the Connections menu.
- Select a connection of type Microsoft Fabric Mirroring.
- Click [ Edit].
The connection settings of the Microsoft Fabric Mirroring connection open and can be modified.
Authentication
The Microsoft Fabric Mirroring supports authentication via Microsoft Entra ID (formerly Azure Active Directory) with Service Principals.
About Service Principal Authentication with Xtract Universal.iQ
An Azure Service Principal (SPN) is a non-interactive identity used by applications to access resources. In this scenario, the Microsoft Fabric OneLake application registered in Entra ID acts as the service principal, allowing the app to authenticate and access data using its own identity. SPNs ensure secure authentication while reducing the risks associated with user credentials or manual authentication processes.
Set up Service Principal Authentication in Microsoft
To set up Service Principal Authentication in Microsoft:
- Register Microsoft Fabric OneLake as an app using the Azure portal > App registrations service. For more information, see Microsoft Documentation: Register an application in Microsoft Entra ID.
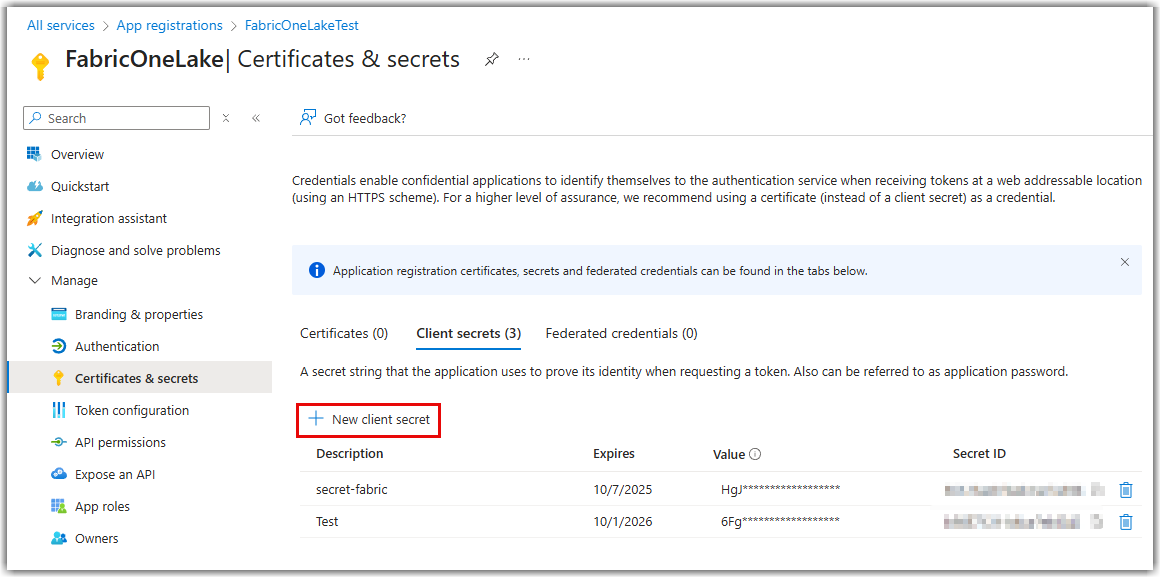
- Create a new client secret and copy the value of the client secret. Note that the secret can only be viewed immediately after creation, so make sure to store it in a safe location.
- In the Microsoft Fabric workspace, assign Contributor access to the registered application.
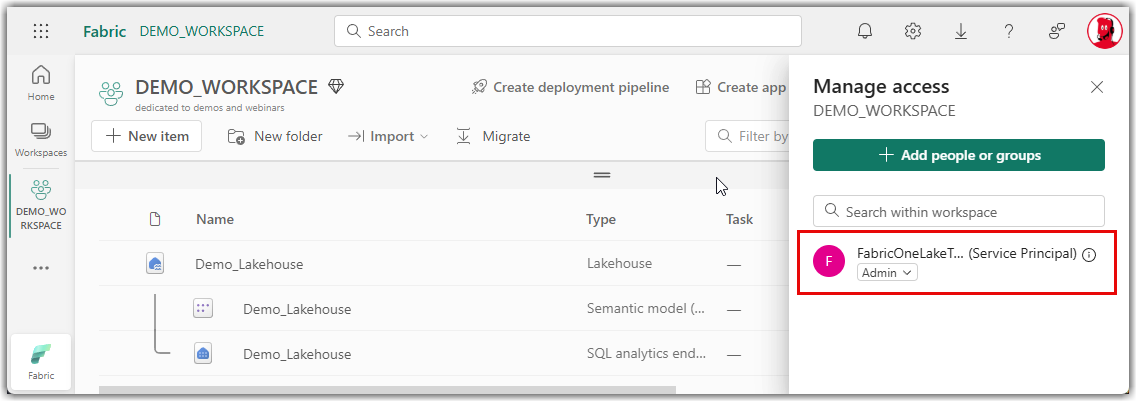
The service principal authentication is ready to use.
Tenant ID
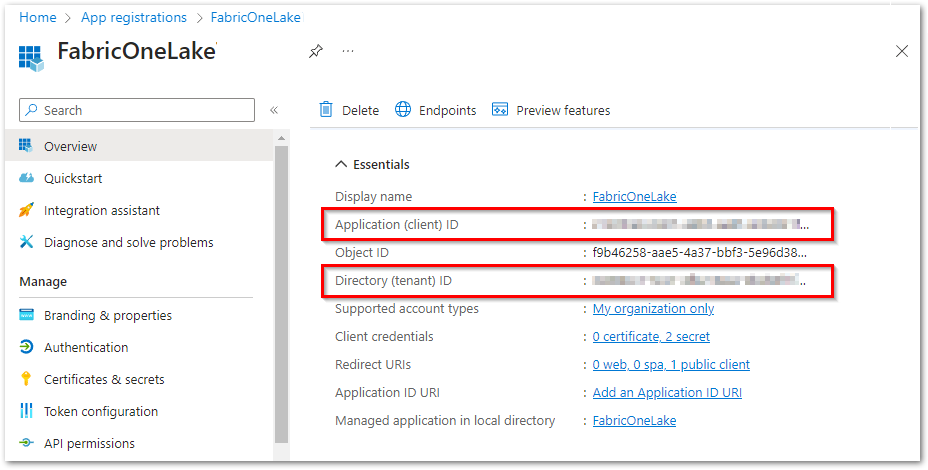
Enter the Directory (tenant) ID of the registered app. You can copy the tenant ID and client ID in the Microsoft Entra admin center or the Azure portal, where the app is registered.
Client ID
Enter the Application (client) ID of the registered app. You can copy the tenant ID and client ID in the Microsoft Entra admin center or the Azure portal, where the app is registered.
Client Secret
This option is only available for service principal authentication. Enter the client secret of the registered app. To copy the client secret, sign in to the Azure portal and navigate to Microsoft Entra ID > App registrations > [your application] > Certificates & secrets > Client secrets. If no client secret exists or the existing secret expired, click [New client secret] to create a new client secret for the registered application.
Note
After creating or deleting a client secret in Microsoft Entra ID, it may take some time for the change to take effect. In some cases, it can take over 20 minutes before the update is recognized by Xtract Universal.iQ.
Test Connection
Authenticate and connect to Microsoft Fabric Mirroring.
When using OAuth 2.0 authenthication, the window "Entra ID" opens and you are prompted to sign in with your Microsoft credentials. Make sure that the Microsoft user does not use Multifactor Authentication (MFA) as extractions fail when the MFA of the user expires. For more information, see Knowledge Base Article: Authentication via Microsoft Entra ID OAuth 2.0.
Warning
The window "Entra ID" shows a blank screen.
If the window "Entra ID" shows a blank screen, the content is likely blocked by the Internet Explorer ESC (Enhanced Security Configuration) on Windows servers.
To disable the Internet Explorer ESC, refer to the instructions in the Microsoft Documentation: How to turn off Internet Explorer ESC on Windows servers.
Misc
Landing Zone
Enter the URL of the Microsoft Fabric Mirroring Landing Zone. The URL uses the following format:
Column Name Formathttps://onelake.dfs.fabric.microsoft.com/[workspace id]/[mirrored database id]/Files/LandingZone/
You can copy the URL from the Microsoft Fabric portal. The Landing Zone URL is displayed in the details section on the Home screen of the mirrored database.
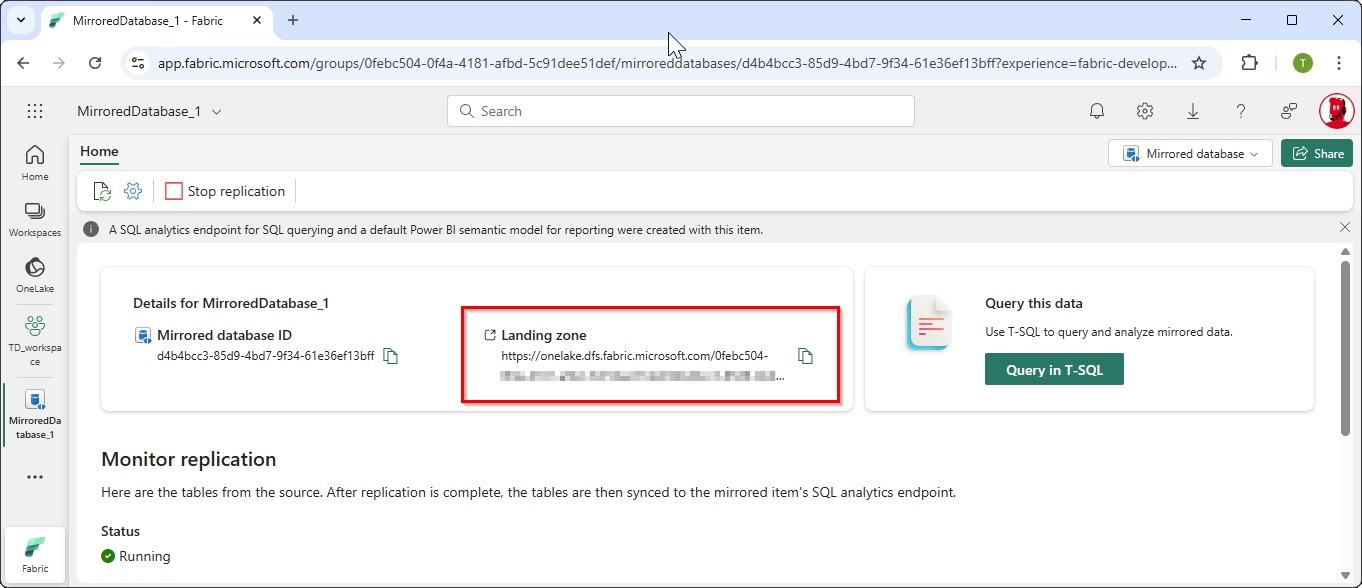
Example: https://onelake.dfs.fabric.microsoft.com/12345678-aaaa-bbbb-cccc-123456789abc/12345678-dddd-ffff-gggg-123456789abc/Files/LandingZone
Destination Settings
Destination settings define how and where a service saves its output data, such as the target folder and filename. Changing the destination settings after the delta table has been created in Microsoft Fabric Mirroring, can disrupt the delta processing.
To open the destination settings:
- Open the Services menu.
- Select a service that uses the Microsoft Fabric Mirroring connection.
- Click [ Edit]. The service settings open.
- Open the tab Destination Settings.
The destination settings for Microsoft Fabric Mirroring are open and can be modified.
File Name
Determines the name of the target table. The following options are available:
| Option | Description |
|---|---|
| Same as service name | Adopt the name of the service. |
| Custom | Define a name of your choice in the Custom File Name input field. |
Append timestamp
Adds a timestamp in the format _YYYY_MM_DD to the filename of the service.
Note
If an object's name does not begin with a letter, the prefix 'x' is automatically appended, e.g., _namespace_tabname.csv is renamed to x_namespace_tabname.csv upon upload.
This ensures compatibility with Azure Data Factory, Hadoop, and Spark, which require names to start with a letter or handle certain symbols differently.
Date Conversion
Convert SAP Dates
Converts the SAP date format (YYYYMMDD) to a regular date format (YYYY-MM-DD), e.g., 19900101 becomes 1990-01-01. Target data uses a real date data-type and not the string data-type to store dates.
Replace SAP Dates 0000XXXX with
Converts the SAP date 00000000 to the entered value.
Replace SAP Dates 9999XXXX with
Converts the SAP date 9999XXXX to the entered value.
Replace Invalid SAP Dates with
If an SAP date cannot be converted to a valid date format, the invalid date is converted to the entered value. NULL is supported as a value. When converting the SAP date the two special cases 00000000 and 9999XXXX are checked first.
Related Links
- Microsoft Documentation: What is Mirroring in Fabric?
- Microsoft Documentation: Open mirroring in Microsoft Fabric
- Microsoft Documentation: Tutorial Configure Microsoft Fabric open mirrored databases