Microsoft Power BI
This page shows how to set up and use the Microsoft Power BI destination. The Microsoft Power BI destination loads data to Power BI. The setup in Xtract Universal.iQ consists of 3 main steps:
- Create a connection to Power BI.
- Assign the connection to a service.
- Define the properties of your output, e.g, filename, column names, etc.
- Use the Xtract Universal.iQ Custom Connector or a Power Query M-script in your Power BI environment to connect to the service.
Supported Power BI Environments
There are two ways to connect your Power BI environment with Xtract Universal.iQ:
The graphic below shows which Power BI environments support which connection method.
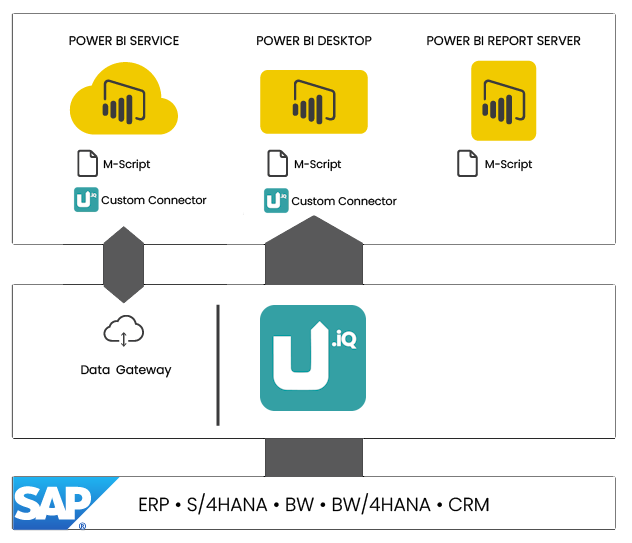
Connect to Microsoft Power BI
To create a connection to Microsoft Power BI in Xtract Universal.iQ:
- Open the Connections menu.
- Click [Add Connection].
- Enter a name in the Connection Name field.
- Select Microsoft Power BI from the Connection Type dropdown. The corresponding settings open.
- Click [Save].
The connection is now listed in the Connections menu and can be assigned to services.
Next, assign the destination to a service.
Assign Microsoft Power BI to a Service
To assign the Microsoft Power BI destination to a service:
- Open the Services menu.
- Select one or more services.
- Click [ Edit].
- Select an existing Microsoft Power BI connection from the Destination dropdown.
- Click [Save].
When running the service, the results are written to the Microsoft Power BI.
Next, check if the service-specific destination settings match your needs and set up the connection in Power Automate.
Setup in Power BI
Connecting Xtract Universal.iQ with a Power BI environment requires a Custom Connector or a Power Query (M-script) in your Power BI environment.
Power BI Custom Connector
Download the Xtract Universal.iQ Power BI Custom Connector. The connector follows Microsoft's guidelines for custom connectors in Power BI.
Install the Custom Connector
To install the Custom Connector in Power BI Desktop, run the install-connector.ps1 and trsust-connector.ps1 PowerShell scripts on Windows or:
- Check if the directory
[Documents]\Power BI Desktop\Custom Connectorsexists on the machine that runs Power BI Desktop. If it does not exist, create this directory. - Copy the
XtractUniversaliQPowerBIExtension.pqxfile to[Documents]\Power BI Desktop\Custom Connectors. - Copy the content of the
thumbprint.txtfile and follow the instructions in Microsoft Documentation: Trusting third-party connectors to add the thumbprint of the Custom Connector to your Registry. - Restart Power BI.
The Xtract Universal.iQ Custom Connector is now available in Power BI Desktop when connecting to new data sources.
You cannot install the Custom Connector directly in Power BI Service. Instead, use an on-premises data gateway to make the Custom Connector available, see Microsoft Documentation: What is an on-premises data gateway?.
To set up the on-premises data gateway that uses the Power BI Custom Connector:
- Install the on-premises data gateway on a server that can access Xtract Universal.iQ.
- Copy the
XtractUniversaliQPowerBIExtension.pqxfile to the machine that runs the data gateway. - Configure the data gateway, see Microsoft Documentation: Use the on-premises data gateway app.
- Switch to the Connectors tab and define the path to the Xtract Universal.iQ Custom Connector. The gateway now displays XtractUniversaliQPowerBIExtension as a Custom Data Connector.
- Click [Close].
The configured on-premises data gateway is integrated into the Power BI service environment.
Load SAP Data using the Custom Connector
To use the Custom Connector to load data in Power BI:
- Create a new data source in Power BI Desktop.
- Select Xtract Universal.iQ from the Get Data menu.
- Click [Connect].
- Enter the server address of Xtract Universal.iQ using the following format:
<Protocol>://<HOST or IP address>:<Port>/. - When prompted for authentication, enter your the authentication details.
- Select an Xtract Universal.iQ service. The "Navigator" window only lists all extractions that use the Microsoft Power BI destination.
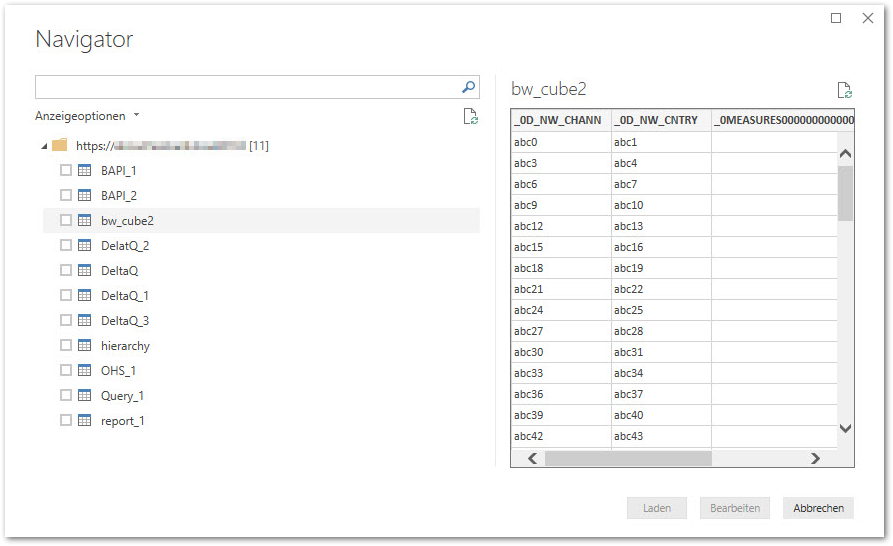
- Click [Load]. This triggers a service run and writes the extracted SAP data to Power BI.
Your SAP data is now available for further processing in Power BI.
Power Query M-script
Download the Xtract Universal.iQ M-script template powerbi_loading_script.txt to connect Xtract Universal.iQ to any Power BI environment.
Load SAP Data using the M-Script
To use the M-script and load data in Power BI:
- Create a new Power BI Report using Blank Query as a data source.
- Open the [Advanced Editor] and copy the content of the
powerbi_loading_script.txtfile into the editor. -
Change the values for ServiceName and ServerURL to match the name of your Xtract Universal.iQ service and server URL:
Query M-Scriptlet ServiceName = "DEMO_SERVICE", ServerUrl = "http://localhost:8075", // Record containing run parameters with corresponding values, can be empty // Usage: <XU.iQ parameter name>= <value or Power BI parameter> // MUST NOT use "name" as a record field here Parameters = [ /*rows= "300", myparameter= SomePowerBIParameter*/ ], -
Optional: Enter values for Parameters to pass them to Xtract Universal.iQ. For a complete list of possible parameters, see Parameters.
- Apply the script. If prompted, provide an authentication method for the connection.
Your SAP data is now available for further processing in Power BI.
Destination Settings
Destination settings define how and where a service saves its output data, such as the target folder and filename.
To open the destination settings:
- Open the Services menu.
- Select a service that uses the Microsoft Power BI connection.
- Click [ Edit]. The service settings open.
- Open the tab Destination Settings.
The destination settings for Microsoft Power BI are open and can be modified.
Power BI Settings
Column Name Format
Defines the format of the column name. The following options are available:
| Option | Description |
|---|---|
| Code | The SAP technical column name is used as column name in the destination e.g., MAKTX. |
| PrefixedCode | The SAP technical column name is prefixed by SAP object name and the tilde character e.g., MAKT~MAKTX |
| CodeAndText | The SAP technical column name and the SAP description separated by an underscore are used as column name in the destination e.g., MAKTX_Material Description (Short Text). |
| TextAndCode | The SAP description and the SAP technical column name description separated by an underscore are used as column name in the destination e.g., Material Description (Short Text)_MAKTX. |
| Text | The SAP description is used as column name in the destination e.g., Material Description (Short Text). |
Date Conversion
Convert SAP Dates
Converts the SAP date format (YYYYMMDD) to a regular date format (YYYY-MM-DD), e.g., 19900101 becomes 1990-01-01. Target data uses a real date data-type and not the string data-type to store dates.
Replace SAP Dates 0000XXXX with
Converts the SAP date 00000000 to the entered value.
Replace SAP Dates 9999XXXX with
Converts the SAP date 9999XXXX to the entered value.
Replace Invalid SAP Dates with
If an SAP date cannot be converted to a valid date format, the invalid date is converted to the entered value. NULL is supported as a value. When converting the SAP date the two special cases 00000000 and 9999XXXX are checked first.