Schedule Services
This page shows how to schedule service runs using the Xtract Universal.iQ scheduler. The scheduler enables automation of recurring tasks in regular intervals, e.g., every 15 minutes, hourly, daily, weekly, monthly.
Create a Scheduler
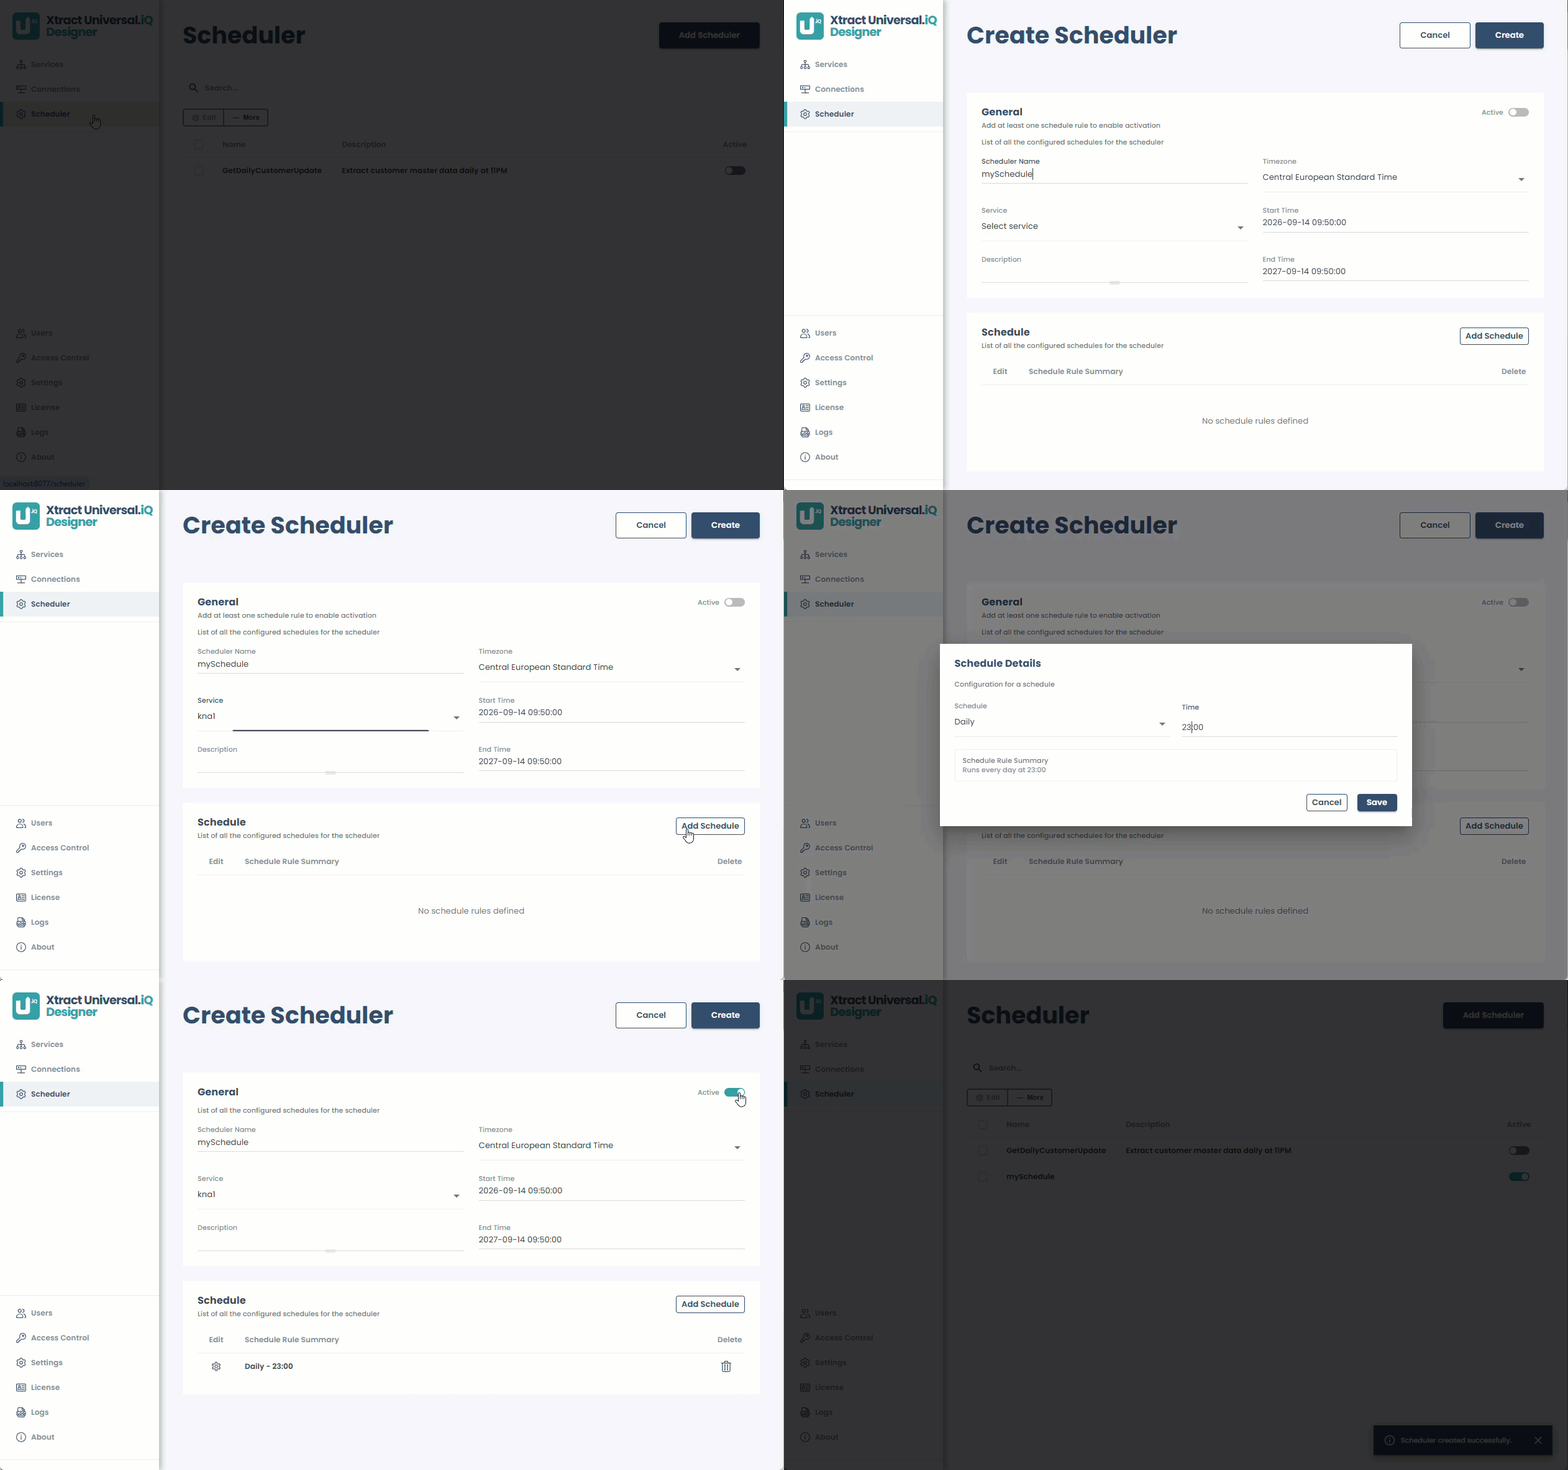
A scheduler defines when and how often a service runs. To schedule a service run:
- Open the Scheduler menu.
- Click [Add Scheduler]. The "Create Scheduler " menu opens.
- Enter a unique name for the scheduler.
- Select the service you want to schedule from the Service dropdown.
- Set the time frame in which the scheduler is active:
- Select a time zone for the scheduler from the Timezone dropdown.
- Set the start time to define when the scheduler becomes active.
- Set the end time to define when the scheduler becomes inactive.
- Click [Add Schedule]. The menu "Schedule Details" opens.
- Select one of the following schedule types from the Schedule dropdown:
- Depending on the selected schedule type, set a time interval.
- Click [Save]. The "Schedule Details" menu closes.
- Activate the Active switch in the upper right corner of the menu to activate the scheduler.
- Click [Create] to save the scheduler. The "Create Scheduler" menu closes.
The service runs automatically based on the defined interval.
Edit a Scheduler
To change an existing scheduler:
- Open the Scheduler menu.
- Look up the scheduler you want to edit.
- In the Edit column of the scheduler, click . The "Schedule Details" menu opens.
- Change the settings of the scheduler to fit your needs.
- Click [Save] to save the changes.
The scheduler is updated.
Delete a Scheduler
Deleting a scheduler permanently removes the scheduler from Xtract Universal.iQ. To delete a scheduler:
- Open the Scheduler menu.
- Look up the scheduler you want to delete.
- In the Delete column of the scheduler, click . A confirmation pop-up opens.
- Click [OK] to permanently delete the scheduler.
The scheduler is deleted and no longer available.
Disable a Scheduler
Disabling a scheduler temporarily stops it from running. To disable a scheduler:
- Open the Scheduler menu.
- Look up the scheduler you want to disable.
- In the Active column of the scheduler, set the switch to Off ().
The scheduler is disabled and can be re-enabled at any time.
General Settings
This general scheduler settings define which service the scheduler automates and the timezone used by the scheduler.
Scheduler Name
Name of the scheduler. The name must be unique and should be descriptive to identify the purpose of the scheduler, e.g., "Daily Sales Data Sync" or "Monthly Inventory Update".
Service
The service that is scheduled. If no service is available in the dropdown list, create a service, see Create a Service.
Time Zone
The timezone ensures that executions align with local business hours. Select the time zone by choosing the UTC offset that matches your current local time relative to Coordinated Universal Time. The default is Central European Standard Time (UTC+1).
Start Time
The start time defines when the triggers become active. By default, the start time is set to the date and time the scheduler was created. Time uses the 24-hour format, e.g., 18:00 for 6:00 PM.
- Format:
YYYY-MM-DDTHH:MM:SS - Example:
2026-04-01T18:00:00(01-Apr-2026 at 06:00 PM)
End Time
The end time defines when the triggers become inactive, e.g., after a project phase is completed, at the end of the year, etc. The scheduler stops working after this time. By default, the end time is set one year after the scheduler was created. Time uses the 24-hour format, e.g., 18:00 for 6:00 PM.
- Format:
YYYY-MM-DDTHH:MM:SS - Example:
2027-04-01T18:00:00(01-Apr-2027 at 06:00 PM)
Schedule Settings
The schedule details define how often the referenced service is executed.
Minutes
Executes every specified number of minutes, e.g., every 15 minutes.
Hours
Executes every specified number of hours, e.g., every 2 hours.
Daily
Executes every specified number of days, e.g., daily at 03:00 AM. Enter the execution time in the 24-hour format, e.g., 18:00 for 6:00 PM.
Weekly
Executes on specified days of the week, e.g., every Monday and Thursday at 07:00 AM. Enter the execution time in the 24-hour format, e.g., 18:00 for 6:00 PM.
Monthly
Executes services on every specified days of the month, e.g., on the 1st and 15th of each month at 07:00 AM. Enter the execution time in the 24-hour format, e.g., 18:00 for 6:00 PM.
If a selected day does not exist within a month, the scheduler ignores the trigger, e.g., the 30th of February. To run a service on the last day of each month, select Last.