Collation Settings for Microsoft SQL Server Destination
This article shows how to solve a common problem that occurs when pushing SAP data into an SQL Server database when collation is not set to case-sensitive. The depicted example shows how to customize the Drop & Create SQL Server statement within the Xtract Universal.iQ destination settings to accommodate these issues.
About Collation SQL Server
Collations in Microsoft SQL Server provide sorting rules, case sensitivity, and accent sensitivity for your data. Collations used with character data types such as char and varchar define the code page and the characters that type can represent.
Collation can be set at three levels:
- Server collation, see Microsoft Documentation: Set or change the server collation
- Database collation, see Microsoft Documentation: Set or change the database collation
- Column collation, see Microsoft Documentation: Set or Change the Column Collation
The MSSQL server offers different collation statements:
| Option | Description |
|---|---|
| Case-sensitive (_CS) | Distinguishes between uppercase and lowercase letters. If this option is selected, lowercase letters sort ahead of uppercase letters. If it is not selected, the collation is case-insensitive, so SQL Server treats uppercase and lowercase letters as identical for sorting. You can explicitly select case insensitivity by specifying _CI. |
| Accent-sensitive (_AS) | Distinguishes between accented and unaccented characters. For example, "a" is not equal to "ấ". If this option is not selected, the collation is accent-insensitive, so SQL Server treats accented and unaccented letters as identical for sorting. You can explicitly select accent insensitivity by specifying _AI. |
For more information, see Microsoft Documentation: Collation and Microsoft Documentation: Collation and Unicode support.
Check SQL Server Management Studio Settings
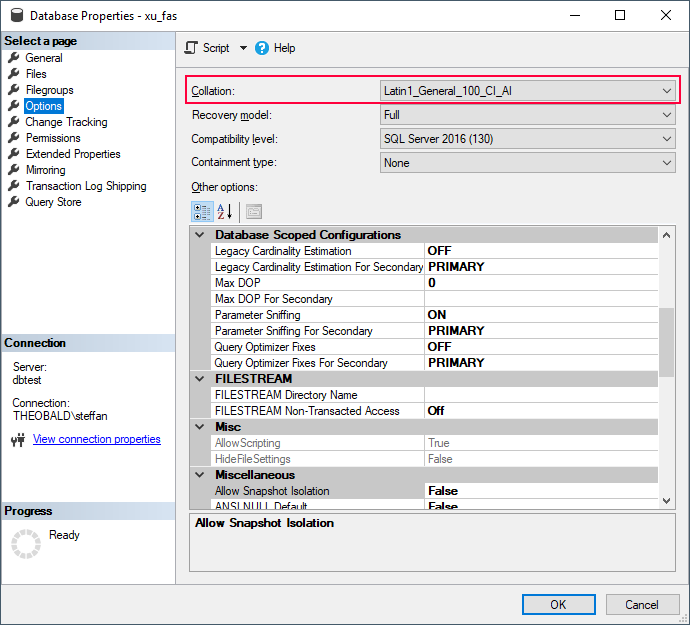
Open SQL Server Management Studio (SSMS) and check if the following collation statement is displayed in the database settings: Latin1_General_100_CI_AI. The _CI suffix refers to "case-insensitive" and the _AI suffix refers to "accent-insensitive".
Setup
To provoke a collation issue caused by case sensitivity in Xtract Universal.iQ, create source records that differ only by character casing in a primary key field. The depicted example service reads data from SAP table MAKT, where the primary key field SPRAS uses both values 'D' and 'd'.
When running the service, both records are treated as unique in the source system but as identical in the target database, resulting in a primary key violation. This results in the following error message:
> System.Data.SqlClient.SqlException (0x80131904): Violation of PRIMARY KEY constraint 'PK__makt__3483F06C110B42CD'.
> Cannot insert  duplicate key in object 'dbo.makt'.The duplicate key value is (800, 000000000000000038, d)
Workaround
As shown in Setup, data that differs by character casing cannot be written to the Microsoft SQL Server destination when the target database uses a case-insensitive collation.
To avoid this issue, customize the SQL statement in the Preparation processing section of the Microsoft SQL Server destination settings:
- Open Xtract Universal.iQ and go to the destination settings of your service.
- In the Processing section, select Custom SQL from the Preparation dropdown.
- Click [Edit SQL] to enter an SQL statement.
- Select Drop & Create from the dropdown menu.
- Click [Generate Statement]. The standard SQL statement for drop and create actions is inserted.
-
Customize the column collation for the field that causes the collation issue. The depicted example shows how to change the collation for the field SPRAS in SAP table MAKT:
IF (object_id('MAKT') IS NOT NULL) BEGIN DROP TABLE [MAKT]; END; CREATE TABLE [MAKT] ( [MANDT] NATIONAL CHARACTER VARYING(3) NOT NULL, [MATNR] NATIONAL CHARACTER VARYING(18) NOT NULL, [SPRAS] NATIONAL CHARACTER VARYING(1) COLLATE Latin1_General_100_CS_AS NOT NULL, [MAKTX] NATIONAL CHARACTER VARYING(40), [MAKTG] NATIONAL CHARACTER VARYING(40), PRIMARY KEY ( [MANDT], [MATNR], [SPRAS] ) ); -
Click [OK] to confirm your input.
- Run the service.
The extraction runs without errors.