Custom SQL in Database Destinations
This article shows how to use custom SQL statements in the staging steps of database destinations. Custom SQL commands can be used to truncate or delete existing data, perform custom transformations, add post-processing logic, and more.
Create a Custom SQL Statement
To create custom SQL statements in database destinations:
- Open the Services menu.
- Select a service that uses a database destination, e.g., Microsoft SQL Server.
- Click [ Edit]. The service settings open.
- Open the Destination Settings tab.
- Select the option Custom SQL from one of the following drop-downs:
- Preparation
- Row Processing
- Finalization
- Click [Edit SQL]. The window "Edit SQL" opens.
- Enter your custom SQL statement.
- Click [OK]. The window closes.
- Click [Save].
The custom SQL statement is executed in the selected staging step.
Use Templates
Existing SQL commands can be used as templates to:
- write user-defined SQL expressions and adapt the data load to your needs.
- execute stored procedures that exist in the database.
To generate a Custom SQL command from a template:
- Open the Services menu.
- Select a service that uses a database destination and click [ Edit]. The service settings open.
- Navigate to Destination Settings > Processing.
- Select the Custom from one of the following dropdowns:
- Preparation
- Row Processing
- Finalization
- Select a staging command from the Template dropdown, e.g., Drop & Create.
- Click [Generate Statement]. Xtract Universal.iQ inserts the statement in the Custom Preparation SQL input field.
- Edit the statement to suit your needs.
- Click [Save] to save the changes.
The custom SQL statement is executed in the selected staging step when running the service.
Note
The custom SQL code is used for SQL Server destinations. A syntactic adaptation of the code is necessary to use the custom SQL code for other database destinations.
Use Script Expressions
You can use script expressions for Custom SQL commands. The following Xtract Universal.iQ specific custom script expressions are supported:
| Input | Description |
|---|---|
#{Extraction.ExtractionName}# | Name of the service. |
#{Extraction.TableName }# | Name of the database table that data is written to. |
#{Extraction.RowsCount }# | Number of extracted rows. |
#{Extraction.RunState}# | Status of the service (Running, FinishedNoErrors, FinishedErrors, Cancelled). |
#{(int)Extraction.RunState}# | Status of the service as number (2 = Running, 3 = FinishedNoErrors, 4 = FinishedErrors, 6 = Cancelled). |
#{Extraction.Timestamp}# | Timestamp of the service. |
Example SQL Statements
Create a Status Overview
The depicted example creates a table "ExtractionStatistics" that provides an overview and status of the executed Xtract Universal.iQ services. To create the "ExtractionStatistics" table, create an SQL table according to the following example:
| Create ExtractionStatistics in Your Database | |
|---|---|
The ExtractionStatistics table is filled in the Finalization process step, using the following SQL statement:
| Fill ExtractionStatistics in the Finalization Step | |
|---|---|
Add a Timestamp Column
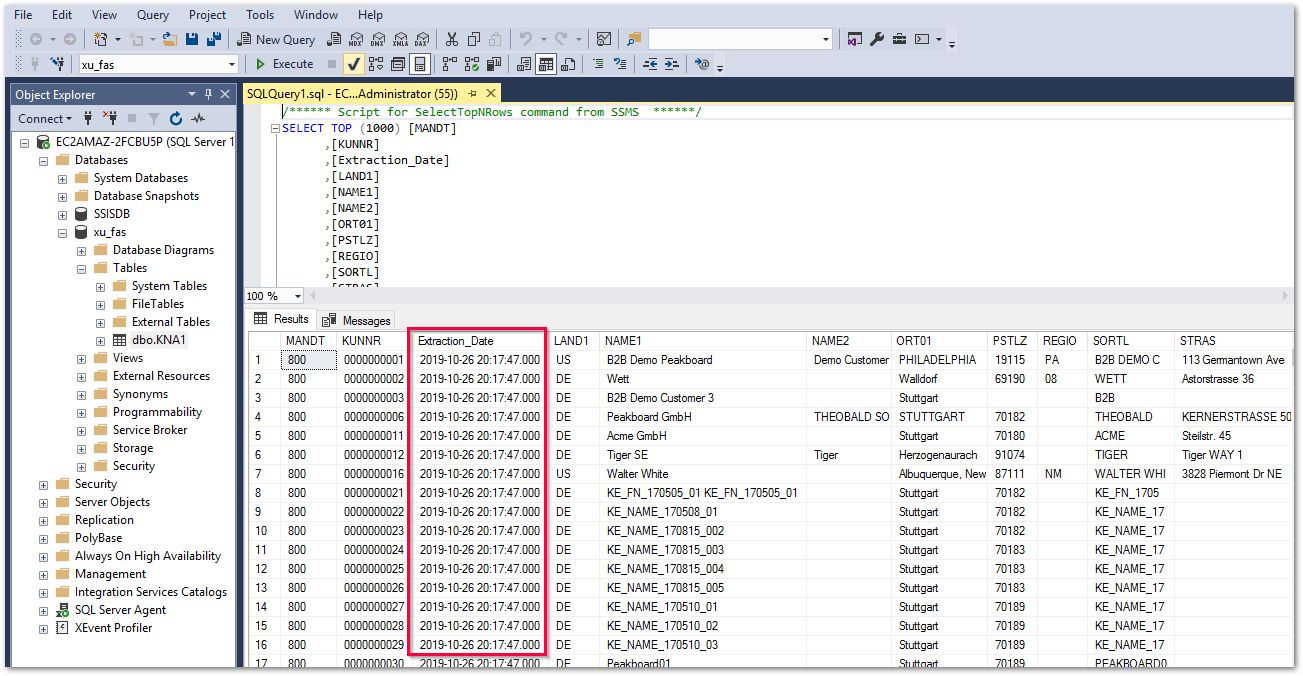
In the depicted example, the SAP standard table KNA1 is extended by a column with the current timestamp of type DATETIME. The new column is filled dynamically using a .NET-based function. The data types that can be used in the SQL statement depend on the database version.
To insert a dynamic column with an extraction timestamp into a table:
- Open the Services menu.
- Select a service that uses a database destination and click [ Edit]. The service settings open.
- Navigate to Destination Settings > Processing.
- Select Custom from the Preparation dropdown.
- Select Drop & Create from the Template dropdown.
- Click [Generate Statement] to use the template of the Drop & Create staging command. Xtract Universal.iQ inserts the statement in the Custom Preparation SQL input field.
-
Add the following line in the generated statement:
-
Select Insert from the Row Processing dropdown.
At this point, onlyNULLvalues are written to the newly created Extraction_Date column. - Select Custom from the Finalization dropdown to fill the
NULLvalues with a custom SQL statement. -
Paste the following SQL statement into the Custom Finalization SQL input field:
Write Timestamp to ColumnUPDATE [dbo].[KNA1] SET [Extraction_Date] = '#{Extraction.Timestamp}#' WHERE [Extraction_Date] IS NULL;The
NULLvalues are filled with the current date of the extraction and written to the Microsoft SQL Server target table. -
Click [Save] to save the changes.
- Run the service to test the changes.
The column Extraction_Date is added to the database table KNA1.
Related Links
- Merge Data in Database Destinations
- Microsoft SQL Server Destination
- Oracle Database Destination
- PostgreSQL Destination
Written by: Valerie Schipka