Secure Network Communication (SNC) via X.509 certificate
The following article describes how to establish an SNC connection to an SAP source system.
The depicted approach uses an X.509 certificate that provides the logon data of the Windows AD user. The correctness of this X.509 certificate is ensured via the company's internal certification authority (ca).
Workflow
- Upon connection start, the Secure Login Client retrieves the SNC name from the SAP NetWeaver AS ABAP.
- The Secure Login Client uses the authentication profile for this SNC name.
- The user unlocks the security token, for example, by entering the PIN or password.
- The Secure Login Client receives the X.509 certificate from the user security token.
- The Secure Login Client provides the X.509 certificate for single sign-on and secure communication between SAP GUI or Web GUI and the AS ABAP.
- The user is authenticated and the communication is secured.
Tip
The configuration of the X.509 certificate should be implemented by the network & SAP Basis team and requires basic knowledge in this area.
Requirements
The following system settings are a prerequisite for using this SNC solution:
- Install the Secure Login Client.
- The SAP application server is configured and activated for Secure Network Communication (SNC).
- The SNC standard library sapcryptolib is used as the SNC solution.
- The following SNC parameters are configured:
| SNC parameter | Value | Example |
|---|---|---|
| snc/gssapi_lib | Path and file name where the SAP Cryptographic Library is located. | $(DIR_EXECUTABLE)\sapcrypto.dll |
| snc/identity/as | Application server's SNC name Syntax: p:\<Distinguished_Name> The Distinguished Name part must match the Distinguished Name that you specify when creating the SNC PSE. | p:CN=saperp.theobald.local |
Step-by-Step Guide
-
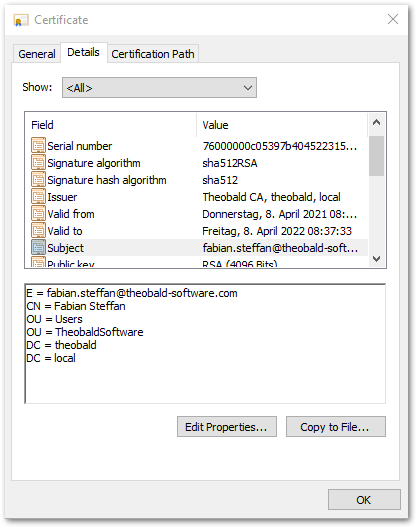
Generate certificate for the application server and AD-user context from common Certificate Authority (ca).

Note
The X.509 certificate is available when placed in folder Certmgr > Personal > Certificates within Windows certificate store (user).
-
Convert pfx file to SAP PSE format e.g.,
sapgenpse.exe import_p12 -p cert.pse cert.pfx. - Import the created PSE file via TA STRUST > Edit mode > PSE Import > PSE Save as SNC Libcrypto.
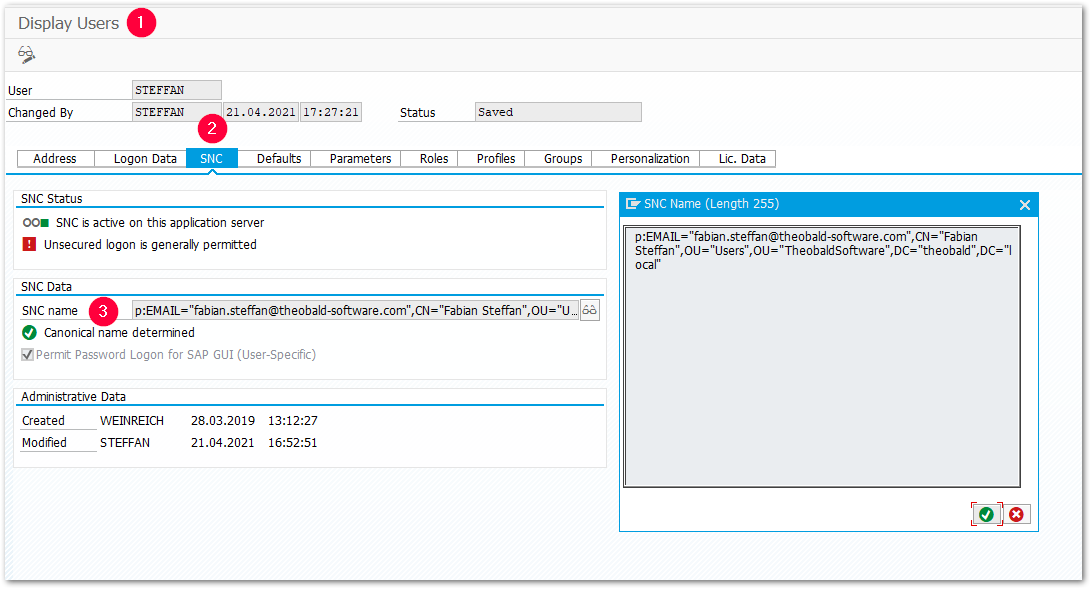
- Edit the SNC configuration of the corresponding SAP user via transaction SU01 , SNC , SNC Name = p:\<Full Distinguished_Name>
e.g.,p:EMAIL="RandomUser@domain",CN="Random User",OU="Users",OU="TheobaldSoftware",DC="theobald",DC="local".

- Set up SNC authentication in the Xtract Universal SAP connection settings.
Releated Links
- SAP Help: Workflow with X.509 Certificate without Secure Login Server
- SAP Help: Secure Network Communications (SNC)
- SAP Help: Configuring SNC: External Programs AS ABAP Using RFC
- SAP Help: Setting the SNC Profile Parameters
- SAP Help: Configuring SAP GUI and SAP Logon for Single Sign-On
- SAP Help: Secure Login Client
- SAP Additional Content: List of SNC Error Codes
Last update: January 7, 2026